%20--%3e%3cpath%20d='M17.73,0v114.51H0V0h17.73Z'/%3e%3cpath%20d='M51.88,114.5h-16.47V26.14h14.33l.72,7.34c4.84-5.91,11.46-8.95,19.52-8.95,14.68,0,22.92,10.74,22.92,30.98v59h-16.47v-58.64c0-11.82-3.94-16.65-11.46-16.65-6.09,0-10.39,3.04-13.07,6.98v68.3h-.02Z'/%3e%3cpath%20d='M124.94,114.5h-16.47V26.14h14.33l.72,7.34c4.84-5.91,11.46-8.95,19.52-8.95,14.68,0,22.92,10.74,22.92,30.98v59h-16.47v-58.64c0-11.82-3.94-16.65-11.46-16.65-6.09,0-10.39,3.04-13.07,6.98v68.3h-.02Z'/%3e%3cpath%20d='M236.85,86.39c0,17.01-9.85,29.72-28.83,29.72s-28.83-12.53-28.83-29.72v-31.78c0-17.19,9.67-30.08,28.83-30.08s28.83,12.71,28.83,30.08v31.78ZM195.49,85.67c0,11.28,4.12,16.83,12.53,16.83s12.36-5.55,12.36-16.83v-30.53c0-11.28-3.94-16.83-12.36-16.83s-12.53,5.55-12.53,16.83v30.53Z'/%3e%3cpath%20d='M250.1,46.02c4.48-12.71,12.89-21.67,26.5-21.67,17.01,0,24.17,11.64,24.17,28.47v44.67c0,3.94,1.79,6.27,5.37,6.27h0l4.06,10.01c-3.09,1.3-7.1,1.81-9.79,1.81-6.8,0-10.92-3.04-13.43-7.16-4.83,5.19-10.92,7.52-18.08,7.52-12.89,0-21.13-9.85-21.13-24.89,0-16.47,8.59-29.19,32.05-29.19h4.48v-9.22c0-10.56-3.22-14.5-9.85-14.5-5.73,0-10.21,4.12-13.25,12.89l-11.1-5.01ZM284.3,97.13v-23.1h-4.48c-12,0-16.29,5.73-16.29,15.58,0,10.56,3.76,13.97,9.31,13.97,5.2,0,8.6-2.15,11.46-6.45Z'/%3e%3cpath%20d='M356.82,50.85c-2.15-8.95-6.44-12.35-12.18-12.35-7.7,0-12.36,4.83-12.36,16.65v30.35c0,11.82,4.48,16.83,12.36,16.83,6.09,0,10.03-3.58,12.36-12.89l12.36,3.94c-3.58,14.32-12.36,22.74-26.14,22.74-18.26,0-27.22-13.61-27.22-29.9v-31.6c0-16.83,9.13-30.08,27.22-30.08,12.89,0,22.2,8.24,25.78,22.2l-12.18,4.11Z'/%3e%3cpath%20d='M416.63,43.15h-17.01v48.61c0,7.34,3.4,10.92,9.13,10.92,2.33,0,3.38-.11,4.47-.54l3.76,9.85c-3.76,2.33-8.42,3.94-14.15,3.94-13.61,0-19.7-8.41-19.7-24.71v-47.18l-9.31-2.33v-11.63l10.21-.72.57-14.93,15.01-4.77v20.05h17.01v13.44h0Z'/%3e%3cpath%20d='M446.53,26.14v88.36h-16.47V26.14h16.47ZM445.64,0v17.55h-14.86V0h14.86Z'/%3e%3cpath%20d='M500.79,114.5h-18.8l-24.35-88.36h18.08l15.76,72.07,15.94-72.07h18.08l-24.71,88.36Z'/%3e%3cpath%20d='M548.06,73.41v12.08c0,11.28,4.66,16.83,13.25,16.83,6.8,0,10.56-3.76,13.43-14.15l12.36,3.94c-3.76,16.29-12.36,23.99-27.4,23.99-18.26,0-27.93-12.89-27.93-30.08v-31.6c0-16.83,9.49-29.9,27.93-29.9s27.04,13.25,27.04,30.62v18.26h-38.68ZM548.06,62.49h23.82v-8.77c0-10.74-4.12-15.76-11.82-15.76-8.24,0-12,5.19-12,15.76v8.77Z'/%3e%3cpath%20d='M614.75,107.12c0,4.4-3.69,8.99-8.77,8.99s-8.77-4.59-8.77-8.99v-1.23c0-4.4,3.62-8.92,8.77-8.92s8.77,4.52,8.77,8.92v1.23ZM599,107.12c0,3.88,2.87,7.2,6.9,7.2s7.13-3.32,7.13-7.2v-1.23c0-3.95-2.95-7.28-7.13-7.28s-6.9,3.32-6.9,7.28v1.23ZM605.91,107.94h-1.34v3.77h-2.31v-10.86h4.03c2.69,0,3.95,1.34,3.95,3.51,0,1.64-.75,2.84-2.16,3.21l2.61,4.14h-2.46l-2.32-3.77ZM604.56,106.3h1.64c1.27,0,1.64-.67,1.64-1.87s-.37-1.72-1.64-1.72h-1.64v3.59Z'/%3e%3c/svg%3e)
Innoactive Spatial supports four anchoring methods. Anchoring defines where streamed content sits in the real world: the same scene can be pinned in mid-air with no reference, locked to a printed marker on a table, attached to a tracked physical object, or aligned to the Logitech Muse pen used as a tracker. Pick the method that matches your accuracy needs and your participants' setup.
Methods at a glance
| Method | Origin | Best for |
|---|---|---|
| World | Apple Vision Pro's built-in world alignment | Quick single-user sessions, free placement |
| Image | A printed marker image you scan with the headset | Collaboration, repeatable alignment, moving between rooms |
| Object | A physical 3D object the device recognises | Reviews that need to anchor to a recognisable real-world object |
| Tracker | A physical 6-DoF tracker (currently the Logitech Muse pen) | Precision references, hard-to-mark surfaces |
Image anchoring is the recommended method for collaboration sessions. When every participant scans the same image, they all share the same spatial origin and the streamed content lines up across every Vision Pro in the session.
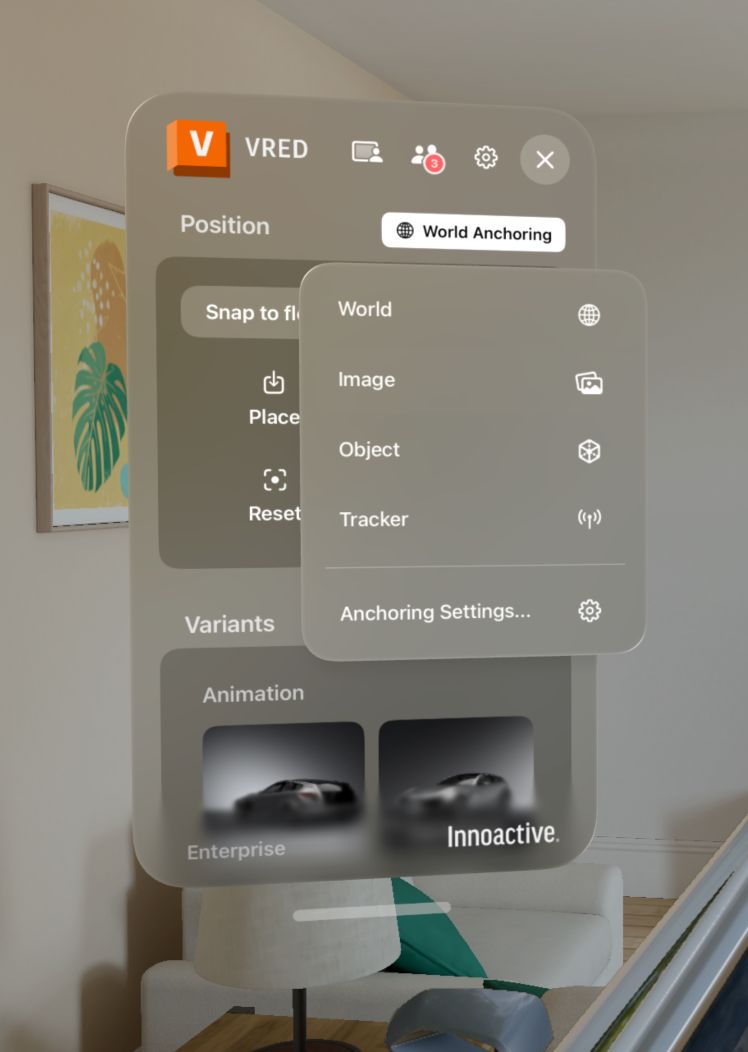
How to enable an anchoring method
- Open Innoactive Spatial on your Apple Vision Pro.
- Enter a session.
- Open Anchoring settings.
- Pick World, Image, Object, or Tracker.
- For Image, point your Vision Pro at the printed marker and wait for detection. For Tracker, follow the Logitech Muse pen pairing guide.
World anchoring in depth
World anchoring is the fastest path — no marker, no setup. Place the model in the room with a gaze-and-pinch and ARKit pins it to the device's understanding of the space.
Prerequisites
- Innoactive Spatial installed and running on Apple Vision Pro.
- Reasonable lighting and visual features in the room. Blank white walls and dim lighting degrade world tracking.
Enable world anchoring
- Open Anchoring settings and pick World.
- Start the streamed session. The model appears in front of you, freely placeable.
- Drag and rotate it where you want it. Tap to commit; the position is stored on the device.
- Next session — the model returns to the same spot as long as visionOS still recognises the room.
Caveats
- World anchors are device-local. They don't sync across participants — for multi-user sessions use Image anchoring instead.
- Rearranging the room or significant lighting changes can invalidate the anchor. Re-place the model when this happens.
- Rooms with very few visual features can let the world anchor drift — add some texture or pick a different anchoring method.
Image anchoring in depth
Image anchoring is the workhorse for design reviews — easy to set up, easy to share, easy to move between rooms.
Prerequisites
- Innoactive Spatial installed and running on Apple Vision Pro.
- A printed anchor image — 50 × 50 cm is the recommended size for the most reliable detection.
- Good, even lighting around the marker.
- For collaboration: every participant scans the same anchor image.
Enable image anchoring
- Open Innoactive Spatial on Apple Vision Pro.
- Enter a session.
- Select Image as the anchoring method.
- Point your Vision Pro at the printed anchor image.
- Wait for the app to detect it. Streamed content snaps to the marker's pose.
Collaboration tip — place the anchor image where every participant can see it. Each user has to complete steps 4–5 individually before the session begins.
Change the anchor image
Innoactive Spatial ships with a default anchor image. To use your own:
- Open Anchoring settings and choose Custom Marker Image.
- Pick the image you want to use.
- Print it at 50 × 50 cm for best results.
- Follow the steps above to detect the new image.
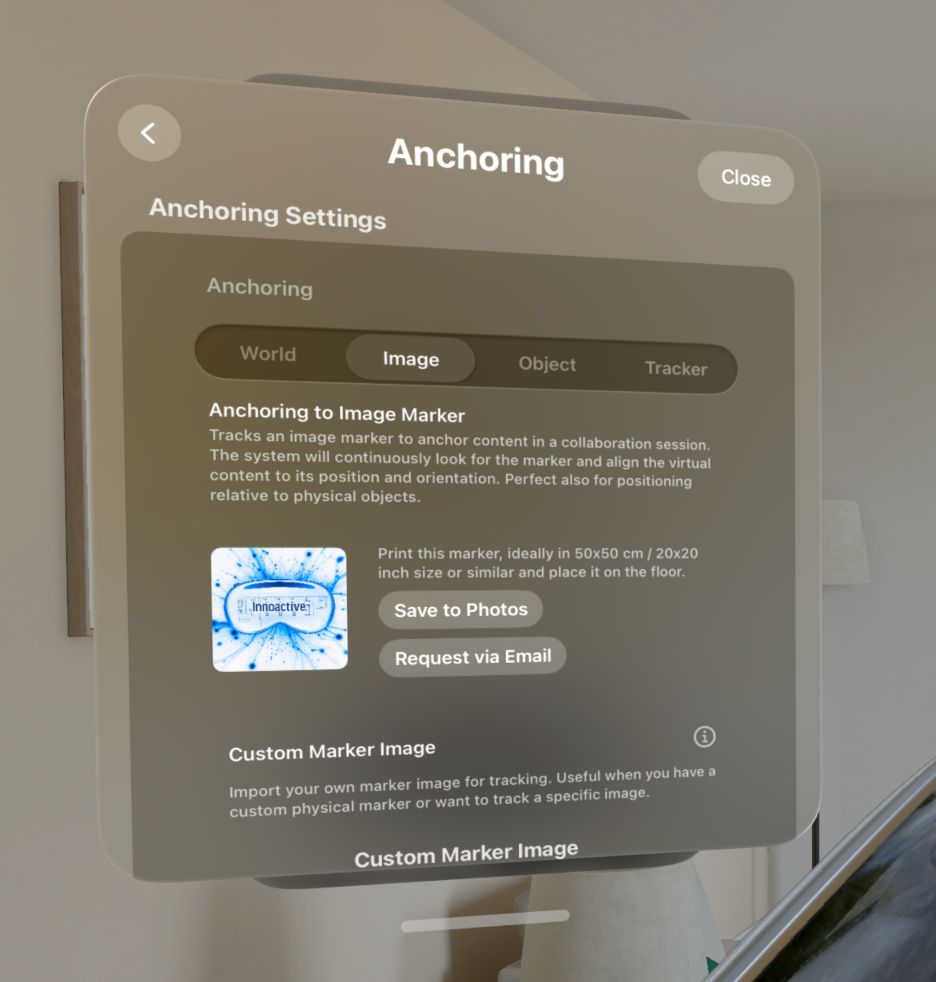
Make sure the marker is flat, unobstructed, and well-lit. Crumpled paper or marker partially out of view slows down detection.
Object anchoring in depth
Object anchoring uses 3D object recognition to detect a physical reference object — a custom-printed marker, a small prop, or a recognisable product — and anchor the streamed scene to it.
Prerequisites
- A trained 3D reference object file for the object you want to anchor to. These are produced offline using Apple's Reality Composer / Object Capture tools. Innoactive Spatial cannot train new reference objects from inside the app.
- The reference object delivered to the device, either via your MDM as part of the managed app configuration or via AirDrop into the app.
- The physical object in view, well-lit, and in the same orientation it was scanned in.
Enable object anchoring
- Open Anchoring settings and pick Object.
- Select your reference object from the loaded list.
- Look at the physical object. The app shows tracking feedback while it locks on.
- Once detected, the streamed model snaps to the object's pose. Move around it; ARKit keeps the model locked.
- If tracking is lost (object out of view, lighting changed), the app holds the last-known position until detection recovers.
Caveats
- Feature density matters. Objects with varied texture and distinct geometric features track well. Smooth, monochrome, or repetitive surfaces are hard to lock on to.
- Reference objects are tied to the physical setup at scan time. Re-scan after major changes (different paint, new decals, swapped panels).
- For automotive seating-buck reviews, image anchoring or the Muse pen tracker is usually faster and more robust than object anchoring — see Seating Buck Calibration.
Tracker anchoring in depth
Tracker anchoring uses a 6-DoF physical tracker as the spatial origin. Today that tracker is the Logitech Muse pen: mount it at a known position on your physical setup and the digital scene aligns to the pen's pose.
Prerequisites
- A Logitech Muse pen, paired with Apple Vision Pro. See Point and annotate with the Logitech Muse pen.
- A way to mount the pen at the reference position — typically a 3D-printed holder, within the user's arm's reach and the headset's line of sight.
- The pen plugged in for charging while in use, so it doesn't drop tracking mid-session.
Enable tracker anchoring
- Pair the Muse pen with Apple Vision Pro.
- Open Anchoring settings and pick Tracker.
- Mount the pen on your physical reference in line of sight to the user.
- Tap Tap to sync next to the pen tip in the streamed view to lock the model to the pen's pose.
- Re-tap Tap to sync at any time to re-anchor if the buck or rig shifts.
Caveats
- The pen needs continuous line of sight to the headset's cameras. If hands or geometry occlude it, tracking drops.
- Loose placement makes the anchor wobble — use a rigid mount for reliable results.
- One tracker per session today; you can't combine multiple Muse pens to triangulate.
- For the full automotive review workflow that combines a Muse-pen anchor with steering-wheel calibration, see Seating Buck Calibration.
When to use each method
- Quick first look in your office — World anchor. No prep, place by eye.
- Multi-user design review around a buck or table — Image anchor. Print one marker, everyone aligns to it.
- High-precision alignment to a known reference point on a buck — Tracker anchor with the Logitech Muse pen. See Seating Buck Calibration.
- Re-using a session across rooms — Image anchor. Carry the marker, place it in the new room, rescan.
Multi-user notes
All participants in a session must use the same anchoring method. Three reviewers on world anchors and one on an image marker will not line up — streamed content reaches them at different origins and the model floats in different positions for each. The host's choice of anchoring is what everyone else should match.
Related
- Seating Buck Calibration — applying anchoring and steering-wheel calibration to an automotive design review
- Point and annotate with the Logitech Muse pen — pair the pen before using it as a tracker
- Spatial collaboration — multi-user sessions